Friday, 17 May 2013

My first tutorial!

I've had some requests for a tutorial about how I made my step out card with the Camden bus on it. Now I've never written one before so I hope it's ok. If you see any glaring omissions or problems please let me know and I will try to fix it!

Below are the dimensions for the card and where to cut and fold. I've used A4 for this one but the original was resized a bit smaller.
Pa
In this pic you can see where I've cut the card and made my valley and mountain folds.
Turn the card over and adhere strong tape to each end as shown.

Here you can see that I've attached one end to my base card. The remainder is plopped forward out of the way. The base card is a whole A4 sheet folded in the middle.

And here it is again, completely attached.

It's up to you how you decorate the pages but a few tips... If you're using A4 paper to add layers you will probably need two the same unless you're very careful cutting the shapes. I just went ahead and cur rectangles for the ends then trimmed out the central bit before I realised this then left me short for the middle section. ( hope you understand what I mean, it's hard to explain!) . Also for the main middle piece it's best to have two separate toppers either side  of the centre fold. I didn't and when I tried to fold my card it wrinkled up.
Well give it a try and be sure to send me a photo of your cards when they're done. :)

More birdhouse.

I thought I would share some more pics of my birdhouse with you today. This one is of the roof which is tiled with circles folded in half. They are surprisingly robust and satisfyingly stroke-able.
This is the view of the back ...
..and here is the secret! Tucked in on the back is a matching mini album. I've finished it almost exactly in the same way as the back, the only difference being the flower as I only had  2 daises and I used the other one to dangle at the front. 
Come again tomorrow and I will let you see inside the album. 

Wednesday, 15 May 2013

Altered Birdhouse

Well I've found it very difficult not to let this slip out before now! There is a new cd coming up from Crafters Companion, on Monday, using the Country Diary of an Edwardian Lady images and I decided I would like to use them in a completely different way. I've had this birdhouse waiting to be altered for absolute ages and I thought it suited the theme very well. I must also say a big thanks to my friend, Heather Stewart, for the original idea, especially for the tiles on the roof. It is so tactile that you just want to stand and stroke it. 
I used papers from the design sets nap the companion papers as well as some bonus papers as well, the edging down the corners is a border and I used Centura pearl card for the fence and the 'hole'. There was a proper wee hole but it was off centre and the heart piece was sitting off square so the OCD in me couldn't cope! I had to fix it. I trimmed the roof with a little lace from my stash and some sparkle and fluff from the Hunkydory kit. The other embellishments are from that kit too. I love how the little daisy dangles from the eaves. I also cut out some of the tiny butterflies and added them to the sides and front with 3D glue gel for added dimension. 

Well I hope you like it, OH and come back later because its got a SECRET!!!

No butterflies!

Ok, so there are butterflies but I love the sentiment on this card. We made this on the first week of class too. A quick card to make, we stamped the 6 butterflies on a sheet of card and coloured them with the broad end of an alcohol marker before cutting them out. The shape was quite simple and there are two different butterflies. We added some stickles but its not showing up in the pic.the yellow layer was embossed using a crafters companion folder and the cut using the embossed design as a rough guide.

Tuesday, 14 May 2013

Ready for Ascot

You may find this card a bit familiar! It's a case of one I did a while back but using different papers. You can find it here http://joyfullyhandcrafted.blogspot.co.uk/2012/06/hats-off.html
There was some debate as to whether it was a dress or a hat but I still think its a hat? What do you think? (if it were a dress I'd like it to be a bit slimmer!) lol

Aaronic Blessing

This card we made on the first week and because it is almost white on white I thought it was quite versatile, being suitable for Baptism, First Communion or Confirmation. It would even serve as a wedding card or some of the group were going to use it as a sympathy card. The cross and labels die are Spellbinders and the border an EK success punch. The embossed layer is a crafters companion folder.

Trio of baby cards.

Well I did promise to share the cards we made at class this term and I've found a minute to get some sorted. They will be uploaded in no particular order, lol

 This one was made using a Woodward stamp and the 'b"s were raised up on foam pads with the little bit of gingham paper pieced in place.
There was a choice of the three colour ways and they were each as popular as the other. 

Monday, 13 May 2013

Vespa

I think this is one of the last samples I will be able to show for this launch as the kits are absolutely flying out! These are the Vespa and tyre track stamps. I decided there was too much space between the shaped layers and added the grey circle between to fill it out a bit.the tyre track makes a lovely stopper!

Saturday, 11 May 2013

Just for you, nephew.

Oh my goodness! I've been having such fun in my craft room that I forgot to post my make for today!!! Oops. But just wait till you see..... 
Anyhow just a quick sideways easel card for today with some simple embellishment and a sentiment as a stopper..
Am off  to gaze at my new creation. Photos coming soon!

Friday, 10 May 2013

Swing out card front

It's almost time! These kits launch at 12 noon today. This time I've made a swing out card. It works on a "z" fold with a section cut out either side of a centre bar, (if that makes sense.) It's easier to see in the next photo. I used one of the concept cards some toppers, ribbon, charms and buttons, as well as pearl and bazzil card. 

Swing out card, inside

I hope you can get the idea of how it swings out. This is the inside of the card.

Thursday, 9 May 2013

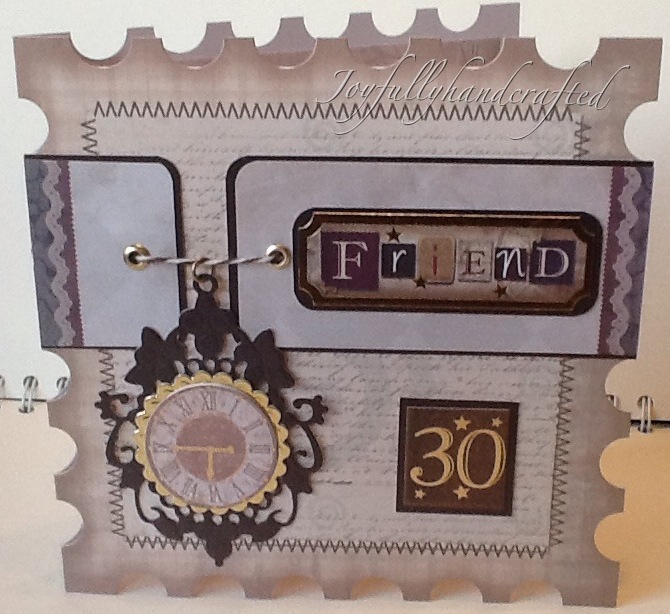
Friends 30th

Well I'm so excited about the pick of the week launch that I thought I would share some more last minute sneak peeks. This one uses one of the shaped cards, toppers and a little bit of bakers twine from the embellishment pack. Mind you I got so excited that I stuck the clock on upside down... Maybe it was meant for Australia, lol. Anyhow I noticed just as I was about to take the photo and hastily stuck another clock face topper, right way up, on top! Crisis averted! Phew :)

Laced, football birthday card

I think this is one of my favourite cards this launch! Don't ask me how it happened because I don't rightly know! I was looking at the card front when a wee light bulb lit up in my head and I thought " Ooh! I could punch holes out down that side and lace it up like a football boot". So away I went. Then I tried to lace it. Hmmm why did it look wrong? Something wasn't working. I even went off to look up different ways of lacing boots.... Then it clicked! I'd forgotten about the tongue! Soo I sliced a piece out of the card and put the blue behind making sure I left enough wiggle room to actually get the twine in there to lace it up.

I'm very pleased with how it's turned out. I really do surprise myself sometimes! The football charm is a cute addition to finish it off.

Red and blue footballers card


On this card I've made lots of toppers from the boot and football image on the stamp set and coloured them all in. The happy birthday stamp with a wee football charm just finish it off. Do you think " Sir Alex" would like it? Anyone know when his birthday is? Lol

No1 dad

I've made this card using some ofthe companion stamps for the Camden Town launch which will be on create and craft tomorrow. Just perfect for that special dad on his birthday or Father's Day! 

Tuesday, 7 May 2013

Camden bus

There's some lovely new goodies coming, from Crafters Companion and Hunkydory,at the end of the week, just in time for all your Father's Day cards. I've used some toppers and embellishments to make this very special birthday card..

Inside of step-out,bus card

This is what the inside looks like. I'm really thrilled with this one as it took me the best part of a day to make but I think it was well worth the effort. It's a pity the bling doesn't show up properly. They look just like little black jelly tots and I love them. 

Saturday, 4 May 2013

Acetate and flowers

Well I think this is going to be the last of my acetate productions for a wee while. I've been having fun with the card companions from some of the CDs and I need to let you see those too, and I'm sure there's plenty of other things too. Come to think of it, I've been teaching my classes in Randalstown and I dont believe I've shared any of those cards either. Hmm it's gonna be busy on here for a wee while. That's a good thing, right? Anyway hope you like this one. I cut the lacy circle with a nestie then used a smaller plain circle to take the centre out. The solid lacy circle on the inside was supposed to hide the adhesive but I used too much and it spread out too much. You can see it a bit. The flowers are raised on different levels so they tuck underneath each other. It just needed the butterfly to finish it off.

Friday, 3 May 2013

Tea light favours.

I've made a favour box from my acetate pack this time. I took a rectangular piece measuring 10 x 28 cm and scored it in half at 14 cm. On the short ends I made a small tick mark with an alcohol marker at 5 cm. From this mark I scored out to the outside edge of the centre fold line. I creased all the scores and then folded the pouch into shape. The tick marks can be removed with a little bit of alcohol blending solution. Finally I used my cropodile to make the holes for the ribbon tie. I've decorated it simply with a sentiment tag and a butterfly, both from the Party Paws embellishment kit. Inside I've put 4 tea-lights and I used a narrow strip of coloured card stock and the border strips to decorate the sides of them.

Thursday, 2 May 2013

Butterflies with love.


I'm still using acetate in this card although its not immediately obvious from the photo. The front section with the little flower detail is acetate sandwiched in between two pieces of card. The lilac background is actually the inside of the card. I've added these gorgeous butterflies to the front and raised them with 3d glue gel. The card is finished off with a sentiment, also from the embellishment pack.

Wednesday, 1 May 2013

Birthday wishes box.

I have been having fun with acetate for a few days and kind of challenged myself to see how many different ways I could find to use it. This time it's a pizza style box which ties closed at the front. The embellishment is very simple using a  party paws border strip and a sentiment topper. I've included some silver encased truffles as a birthday treat. 

Tuesday, 30 April 2013

Party paws!


Today I want to share an acetate bag  and matching mini album I've made using some Party paws goodies. The album measures about 4" square and has 8 acetate and 8 coredinations pages which I've embellished with some elements from the party paws embellie kit. The bag is 5" square and about 11/2" deep. This would make a lovely gift for a special birthday or with a few changes for a new mum or gran to use as a brag book.

Thursday, 18 April 2013

Strawberry faerie


Today I have a gate-fold easel card to share with you.

This is my second stamped image, the strawberry faerie, and I've used some elements from one of the card companions as well as a sentiment to complete my card.

Unfortunately this was the first image I coloured and I got so involved in getting the colours how I wanted them that I completely forgot to take note of which ones I was using. 

Wednesday, 17 April 2013

Sweet violet frame

I've another frame card for you today, from the faerie poppets cd. I've printed onto Neenah card and sprayed the frame with gold spray n sparkle. I used some trim from my stash to decorate the frame this time. It really doesn't take much to finish these off and I'm happy to say there were no accidents this time! ;)

Tuesday, 16 April 2013

Baby rosebud, and butterfly.

Welcome to another sneak peek at the faerie poppets Cd. This time I've featured one of the stamped images, baby Rosebud.

Baby Rosebud

This darling image is one of the new stamps which will be available with the new release. 
I coloured her with my spectrum noir pens. 
Roses and wings  PP1, PP3 and PP5
Leaves and stems CG1, CG2 and CG3
Skin  FS2, FS3 and TN2
Hair as skin with EB2 also
Eyes  CG1
Shadow  BGR1

Monday, 15 April 2013

Elfin lanterns!


I saw a similar idea to this the other day and since this little fella, which is actually one of the notelets from the Faerie Poppets Cd, has an elfin lantern what better way to use him than it turn him into a gift of pretty tea lights. The cylinder is an up cycled toilet paper inner. I used a cap from a soft drink bottle for the inside at the bottom but adapted part of a second core to make the lid so it would fit down inside the container and around the tea lights. It's not the neatest job in the world but its not too bad either! It's just something a little bit different. 

Sunday, 14 April 2013

Angel wings frame.


I expect you all thought I'd got lost but I've had an awful cold and although I've been doing bits and pieces of colouring and cutting I've not really been getting things finished. This is a lovely little frame  picture from the soon to be launched Angel Wings CD by Crafters Companion. I used collall 3D decoupage gel to get plenty of height to the layers. The frame itself is glittering with iridescent spray and sparkle. I created the circular frame using a Marianne die and some gorgeous Centura  pearl card stock. Gosh I love how beautifully it embossed!  Can you keep a secret? I had to put the butterfly on there because I accidentally tore the frame whilst assembling it! I know you won't tell on me! Lol. 

Friday, 5 April 2013

A Morning Stroll.


This is a CASE of a card I saw on the crafters companion blog. I copied the idea of the cut out frame. The orange layer was embossed then cut using a scalloped rectangle die. I also liked the idea of the distressing around the coloured image. I chose autumnal colours for the girl and used Spectrum Noir pens.

Thursday, 4 April 2013

A perfect day


I made this card a couple of weeks ago as a sample for Heather in Doodlecraft. I used a crafters companion embossing folder and spectrum noir pens. I think my colouring might be improving?

Pop up frou frou

This card was made fairly quickly yesterday. I used a craft knife to cut around the top portion of the card so that it would pop up when folded into the easel position. I coloured it with my spectrum noir pens but as usual got so involved that I didn't take note of which colours I actually used!

Sunday, 31 March 2013

Silhouette sparkle.


This is a little card I made some time ago and which missed being added to my blog. I used a stampin up stamp and added some heat embossing with a sparkly WOW powder. The top part if the background is embossed using an embossing folder and an embossing machine. I used a punch to achieve the little 'hollows' for the card candi to fit into. A piece of patterned ribbon hides the card join.

Friday, 29 March 2013

Two of a kind again.


Two glamorous ladies back for you again today. They've been coloured with Spectrum Noir pens using the colour inspiration from the papers printed from the Frou Frou cd. Have you got yours yet?

Thursday, 28 March 2013

Froufrou note book.


Oh I can hardly wait. This range is launching at 8pm tonight on Create and Craft! I've used some of the papers and the images on the cd to create this little note pad cover. I think this is one of my favourite images from the cd.

Wednesday, 27 March 2013

Frou Frou again!


Today I have an unusual card design for my Frou Frou sample. I used some of the toppers from the cd to decorate each panel and left them fairly plain, just a few gems on the corners to embellish it. My thinking was that this would be a good card to use when there are a number of people needing to send greetings together, maybe to a work colleague. Each person could use a separate panel to send their thoughts. It folds down and fits into a normal C6 envelope.

The other side.

You could probably stick this so that it would be like a mini book but I like how it stands as it is. 

Tuesday, 26 March 2013

More Frou Frou


Today I have an image from the Frou Frou cd for you! Layered with lots of luscious embossed elements and embellished with lace and sparlkly gems you will be able to make yours if you pop along to the launch on Thursday. It's sure to fly out so don't be late!

Monday, 25 March 2013

Two of a kind.


It's coming soon! Frou Frou will be released on Thursday 28th March as a pick of the week from Crafters Companion! Aren't  these two ladies very elegant! I wish I had their figures.... Aw well I'll keep on dreaming! Lol

Sunday, 24 March 2013

Frou Frou no 2


Another sample for you today! These designs are totally gorgeous, and a little bit "oh la la"! This is one of my favourite images.  They will be available from Crafters Companion later in the week! 

Saturday, 23 March 2013

Sneak peek!


Just taking a minute to let you have a little sneak peek from the gorgeous cd launching from Crafters Companion next week!

Tuesday, 12 March 2013

A morning stroll


Well this card almost ended up in the bin. I had it all put together when I decided that the skirt really needed to be a bit darker. I picked up a pen and did a couple of strokes before I realised, to my horror, that it was completely the wrong colour and much too strong. I quickly grabbed a better one and went over it. I think I've toned it in not too badly. At least it escaped being binned! Lol

Felicity


This is a little image, from Crafters Companion, which I coloured a little while ago but then got stuck as I couldn't get a layout which pleased me. I began tidying my desk today and found her again so finally put her together as you see here. The bubbles are covered with glossy accents but its not showing up too well in the photo. Also this image comes as a fairy but I decided I would like to see what she looked like, without wings, as just a little girl.

Sunday, 3 March 2013

Butterfly and doily.


This one of the cards we made at the workshop in Randalstown. A fairly easy card with a little stamping which isn't showing up too well. It says "picked just for you". 

Molly and friend to friend.

Molly and "friend to friend".

I was fortunate enough to be asked to conduct a one day workshop in Randalstown Arches Centre at the end of January. These are two of the cards we made. I was advised to assume that no one had any card making experience. We began with the bags card using simple shapes and some colourful tissue paper saver from Christmas gifts. I explained that card making needn't be an expensive hobby if we think about ordinary things differently. The card using a Molly Blooms stamp was a bit more complex but I had chosen the colours to tone in with the papers so this made it work well. 

Friday, 1 March 2013

News!

Well, it's a new month and boy do I have exciting news to share! I am privileged and pleased to announce that I've been asked to join the Crafters Companion design team!! So keep a look out for lots of new and exciting sneak peeks!