Saturday, 10 March 2012

A tisket a tasket...


Well not quiet a green and yellow basket but almost. I must say I had planned something completely different than this for Tuesday evening class, but when I came across the idea I was a complete basket case. I've made 8 so far and all those papers I've been hoarding? What a great way to use them up!
On the other hand I always fear I'm gonna push the class so hard they won't come back!! Lol. This creation is made from 12" square card and paper and takes just over a sheet of each. The version we made in class was much plainer and began as a 6"square. If you want to see them they're on Cleo crafts blog page. Instructions can be found at thelittleblueroom.com. If you go to the drop down tab 'the desk' and scroll way down you'll find them. Lots of other ideas there to inspired you.
This one will go to my lovely mum with the fuschia card and I'll have to find something to put in the basket too.

Diamond pocket fold


Hi everyone and apologies for being missing until so late this week. I'm preparing for a trip to Cardiff and have been really busy.
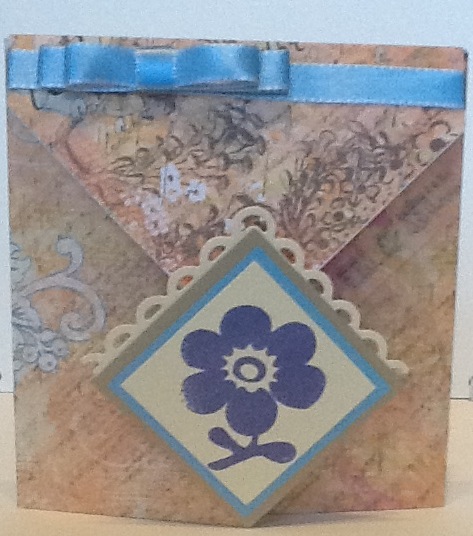
 Well I had 3 classes this week and it was nose to the grindstone for all I can tell you. I worked hard doing the prep and everyone else did too completing them. Tuesday morning class made this card. I found the instructions on you tube and what is essentially a piece if 12"x12" paper becomes quite impressive. It ends up measuring about 4.5"x 4.75". The paper is from k&co and is called que sera sera floral collage. The stamps are the do crafts V&A potpourri set again. They are stamped with Paris dusk memento ink. if you want to find instructions please go to the site I found them on, www.wickedlywonderfulcreations.blogspot.com or look up origami diamond fold card on you tube

Butterflies again

This was the 2nd card on Tuesday morning and I love the rainbow colours and how the simple design comes together. I had originally made it without the card candi but thought it needed something. I opened my drawer for some tape, saw the candi and knew that was just the thing. This is very similar to a card I saw on someone's blog recently but I don't remember whose. Please let me know if you've seen it so I can attribute credit. The embossing folder is "Venus."

Saturday, 3 March 2012

Flower power

I know I was supposed to put photos on yesterday but a friend reminded me that she was heading to Norma T's class today and I didn't want to spoil the surprise for her. I've been busy in the craft room but have decided I'm going to use some of the ideas in class so will hold off posting them till they're taught!

Meanwhile this is a card made with the doily and flower. The background paper is a Kate Knight design which came as a gift in a mag. I used the cut-offs to decorate the front of the envelope. The butterfly is punched out of the card I dragged through the cosmic shimmers while they were still wet on the protective sheet. Waste not want not!!


These magnificent fuschias are all thanks to the brilliantly talented Norma. I had a great time at her class last week and still can't believe how amazing these turned out. Margaret C I know you will love making them with Norma too!! These are so 3d that they need to be posted in a box but I honestly think they are well worth the wee bit extra expense. I think my mum is going to get this card on 18th for Mother's Day.

Thursday, 1 March 2012

Did you guess??

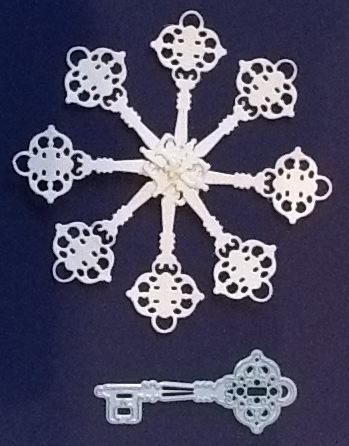
The 'doilies' are made with the Marianne Creatables Christmas baubles. I did say there was a clue!! Can you see why I got so excited? Or am I just a raving lunatic after all, lol. Simply cut eight and hold them together with a brad. I think I'm going to try using two different lots of four to see what other styles I come up with. Hope you loved it too!! Back tomorrow with more photos. See you them :)

Here they all are.


The key is a little different. I poked a hole at the end so the decorative head was out.

Dandelion wishes

The second card is a decorated squash fold. This is basically a tea bag fold only done bigger and can also be extended to make a mini book. It's amazing that how that wee bit of glamour dust just gives it a lift.


The green behind the topper was embossed in the Cuttlebug but it doesn't really show up too well. We started off with an 8" square and the finished piece is 4". The dandelion is from Stampendous. It was inked and stamped twice so the second image was paler. The bamboo in the top right corner is a Papermania V&A clear stamp. The edges were distressed with fired brick and a tiny bit of peeled paint distress inks. The organza ribbon was trapped behind the topper with the foam pads used to raise it up.

Dandelion wishes, inside.


This is how we decorated the inside. We used the fired brick again and a big dandelion head stamped randomly all over the red base card. The same double stamping technique was used too.

This is the day

Well I did promise to update you today but I got into the craft room and everything just seemed to work out so it was hard to drag myself away. I will upload some photos tomorrow. Meanwhile this was one of the cards we made in class this week.


It is a CASE of one I saw on vervestamps.blogspot.com. I reversed the colour scheme and put less bling on too. Love how it turned out. It's good to get more spring time colours and a bit of freshness into the card making again and when it's a beautiful day it's even more reason to praise God and rejoice!!

Monday, 27 February 2012

Teaser part 2


Some more of my "new" doilys! Btw, Norma T, if you are reading this, you're gonna LOVE it too and I bet you have these dies!!

I made the flower, after watching a tutorial on you tube, and from some tissue type paper that was in a scruffy old book I picked up in a charity shop. The pages were rather lovely, handmade with flower petals in and this stuff between each page (white tho) but the fabric cover was patchy and faded. It only cost £1 and I have about 16 just bigger than A3 pages of each type. I can definately use them somehow, the tissue in flowers for sure.

Ok I'll be back on Wednesday or Thursday for the big REVEAL on the doily story! Hope you all love it as much as I do! Ttfn.

Little teaser 1


Ok, here it is!! Now, I have been looking at lots of blogs and magazines and have been coveting the lovely doily dies other folk have been using. I've even looked some up and made wish lists ready for pay day. Well remember I mentioned tidying my craft room? I started to label all the CD cases I store my dies in and was running over the ideas from the class I attended on Friday in my head. There we used a Christmas die for something completely different. Well the old brain got to ticking and as I was labelling one particular lot of dies the penny dropped! Now what do you think of my gorgeous doilies? And I haven't spent any more money. Can you guess what I used. There is a wee clue here. I am gonna keep it as a wee teaser for a couple of days!! I know, cruel aren't I? I promise I will tell you later in the week. :) :)

Hot Diggety Dog


Card no2 from last weeks class. This card was put together very quickly as there was just a bit of layering and some stamping and colouring. This was good because all the colouring and layering from the owl card took ages. I can honestly say that the class was the quietest I've seen them yet. Note to self, plenty of colouring in and cutting out in future!! Lol. The base shape is a circle cut on the Grand Calibur and folded in half. This means the card will rock. A scalloped circle adds interest and the Papermania flowers are the finishing touch.

Oh did I tell you I was super excited about something? Did I, did I? Ooh I can't wait to show you! I can just hear my eldest child saying 'mum, you freak!' but really, you won't believe it. Will show soon!!

What a hoot


Well apologies for the lateness of this post. I do have kind of an excuse. I stayed with mum Tuesday to Friday and went to a class myself. Spent some time on Saturday preparing for this weeks class. Anyway I got to tidying my craft room and in the process had one of those " light bulb" moment and ooh I AM SO EXCITED!!! I mean really really excited! I will share but .. Not just yet ! Lol ;)

Anyhoo, back to the cards. This week we played with this little critter from Woodware. She is stamped 3 times and layered up. The tulips are made from the wings. I encouraged everyone to go with their own colour choices and we had some really lovely results ranging from blues, to shades of brown. They are coloured with pro-markers and the background is stamped with rosebud Memento. Some of the ladies wanted instructions for making the diamond top folded card. I will post these later when I work out best how to explain it!

Thursday, 16 February 2012

The Surprise


The first card we made this week was the sympathy card I had made as a sample for the shop. When asked if there was an occassion the ladies particularly wanted a card for this was their request. (I published the photo in my blog on 19th January.) To lighten the mood this was the Surprise in the second card.

Easter Egg


I went for a wee fun card for the second offering and tried to do a bit of up-cycling at the same time. The background was created using leftover strips of patterned papers from previous projects. (almost got my tongue in a twist even writing that) lol! The gold and chocolate egg shapes were cut using the X cut dies and embossed with one of the new tri boss folders from Papermania. Before embossing we cut them in half with an X cut scalloped oval die. We coloured and cut around the little bear from a Forever Friends springtime set of clear stamps. He was then popped onto the back of the lower half of the egg shape and this piece attached with foam pads to the chocolate coloured paper. We matched up the top half of the egg with the bottom, poked a hole and attached it with a nice wee leaf brad which tied in nicely with the embossed design. The whole thing was layered up and we punched two flowers, again from scrap pieces, with a Tonic punch and added them to the sentiment to take the baroness off the finished card. The "surprise" got lots of awww's.

Friday, 10 February 2012

Pocket fold #2


Tuesday evening saw the second class of the day and whilst most of the "students" were newbies I also had some who had been to the morning session so two more cards were called for. The first was a revisit to a technique I had previously used but this time I made sure it would fit in the envelope. Thankfully no-one had made this one previously. The paper used is a Prima one called "Sweet fairy Collection". Instead of the rose which I had used last time I chose a beautiful Marianne Creatables butterfly. By the way, if anyone struggles to remove these from the die, as I did at first, try rubbing it with hard soap before cutting. The die cut shape will then just pop out for you. No more poking, tearing and muttering under your breath!! Lol. We added a few ivory pearls as embellishment to the butterfly body.

The next card uses the Papermania "Moments of Faith" stamp set. Out came 'Elegant Edges' again and I had prepared the shape, frame and shadow for the stamped image beforehand. The card is 5.5" wide and 6.5" long, but scored 4.5" from one end to leave space for the gate fold band at the bottom. This was made using the off-cut from the side of the card and has been wrapped along the back and around the sides. I had marked centre points on both the card and the strip so that i got it even. It overlapped in the middle a little but I trimmed the legs back? Pink bazzil card was punched along both edges, although you can't see it in the photo, and attached together with a strip of narrow green paper and some iridescent ribbon along this gate folded piece to decorate it. Once the stamped image had been coloured, using pro markers, we layered it up with the shadow, and frame then attached it to the card base. The top area had been covered with Prima 'Sweet Fairy Collection' paper earlier. One of the EK Success layered butterflies added to the edge of the frame is the finishing touch. To tie it in with the gate folded section we cut one of the layers in pink and put a little Glamour Dust down the body and along the edges of the wings using a Quickie glue pen.

Anyone for coffee?

Well I'm gonna get myself caught up so here goes. I had 3 classes this week (one a repeat) so the pressure was on. I saw this first idea on a blog somewhere, look at so many I loose track, and immediately thought of Louise, my boss. I didn't want to make it specific to Valentines day so thought the with love sentiment (another freebie) was general enough. This was a simple wee card to make, just a selection of heart shaped punches and dies, along with the free stamp from the previous issue of Craft Stamper magazine. The edges were inked with Black cherry Staz On. A little wide ric-was stuck onto Kraft card behind the hearts some of which were stuck flat and others raised. We raised a narrow band of white linen card on another piece rounded on the top 2 corners to suggest the lid shape. I tinted along the edges but in hindsight would prefer to have left it clean.


Study in Blue

This card was inspired by one I saw on Inking Idaho and loved so had CASE. I used a mix of Kaiser craft 'lullaby collection' paper and the Papermania big bloomers and buttons. The shapes were cut with the Criuct and my favourite cartridge, Elegant Edges. I honestly don't know what I did before I got this one, it rarely seems to be out of the machine these days!! Stormy sky distress ink was used to tint the edges and a little Tonic punch (one of the pairs) creates the contrast in the flower centre. I had originally tried a circle but it was too overpowering. Some curled organza ribbon and a few branches from the stampin-up up bird punch gives a little more texture. As I was about to take the photo I realised that it just needed a dashed white line around the dark mat to finish it off. I have to say I was "well chuffed" with the result and expect to be creating a batch of similar ones both in blue and pink.

Thinking of you

Well apologies all round folks. I just seemed to completely loose my mojo last week and have got a wee bitty behind with blog updates. We did make two cards last week and this is the second offering. We used the new Papermania, Daisy and Dandelion stamps coloured with Pro-markers. There was a little 'thinking of you' sentiment stamped in dark purple inside the smaller oval but of course I got a bit ahead of myself and photographed it before doing my own!

Daisy, thinking of you

Thursday, 2 February 2012

Just a little note


Well this was the first offering for class this week. I have had it in reserve for a wee while and the ladies loved it. We folded the edge of the card back and made the whole thing square again by adding a strip of Echo Park 'Victoria Gardens' paper. This left a wee problem as the paper is double sided, so after adding a strip of ribbon over the join we put a whole piece of white on the inside front cover. The folded " bracket edge was tinted with worn lipstick distress ink. Behind this we put a little piece of American Crafts "romance- love struck". We cut and embossed (honest this photo was my trial run and the embossing is missing!!)a beaded oval using nestabilities dies and threaded the gingham ribbon around tying into a bow. This was attached to the card front with foam pads. The stamped image was created using the Stampendous wildflower sprigs set, and the ladies had a choice of greeting. Each began 'Just a little note...' and then they could choose " to cheer you", "to say hello" or "to thank you". If time had allowed we could also have tinted the beads of the oval whilst still in the die.